Installing your kickstand
 You first
may want to prepare the necessary tools. If you feel uncomfortable doing the
task yourself, it is strongly suggested that it be taken to a capable friend or
mechanic. You will need a stand or a buddy to hold the bike while swapping
stands. You will need a 10mm wrench or socket and a 17mm wrench and socket. You
will also need pliers or other suitable tool for removing the springs.
You first
may want to prepare the necessary tools. If you feel uncomfortable doing the
task yourself, it is strongly suggested that it be taken to a capable friend or
mechanic. You will need a stand or a buddy to hold the bike while swapping
stands. You will need a 10mm wrench or socket and a 17mm wrench and socket. You
will also need pliers or other suitable tool for removing the springs.
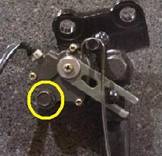
- Using a 10mm wrench or socket, remove the bolt from
the kickstand switch that is shown in the picture at right.
- With the bike on a stand or buddy supporting the bike, raise the kickstand to the up position. In this position it is easiest to remove the springs and the switch. While removing the switch, observe the locator on the back and how it fits onto the bracket. Tuck the switch out of the way and remove the springs.
- Let the kickstand back down and remove the jam
nut on the back of the kickstand with a 17mm wrench. Using a 17mm socket,
remove the bolt from the front of the kickstand and remove the kickstand.
You are removing the kickstand only, not the entire bracket.
- Clean the bracket and re-apply grease to the
bracket and kickstand bolt and to the mating part of the new stand. You
may want to observe the new kickstand and compare details with adjusting
instructions below.
- Install new kickstand and follow steps in reverse
order, making sure all fasteners are tight. You can torque the bolt to 25
ft-lbs and the jam nut to 35 ft-lbs. Be sure
springs are put properly back into place. And be sure the switch is put
properly back into place with the groove in the arm fitted properly around
the stud on the kickstand. Recheck to be sure all fasteners are tight. It
is also strongly suggested to test and make sure the switch is working
properly. While on the bike with the kickstand up, start the bike and with
the clutch pulled back, put the bike in gear. Being careful not to let out
on the clutch, put the kickstand down. It should kill the bike just before
it is all the way down.